Back to CapitalForecastDirect Main Menu
Update Building Components
Updating your Building Components allows you to create multiple instances of a building system or site item at a Location or Building. This would be used to split your systems so that you can show different renewal dates, materials, etc. for parts of the same system. For example, a section of roof may have been replaced recently giving it a different renewal date from the rest of the roof.
Watch the Video Tutorial:
Updating Building Components
- Once you have run the Building Component Wizard for a Location or Building, you will be on the Building Components page. This will list all of the Building Components for this particular Location or Building.
- You can also get to this page by clicking on the Building Components tab and filtering for a particular Location, Building, or System.
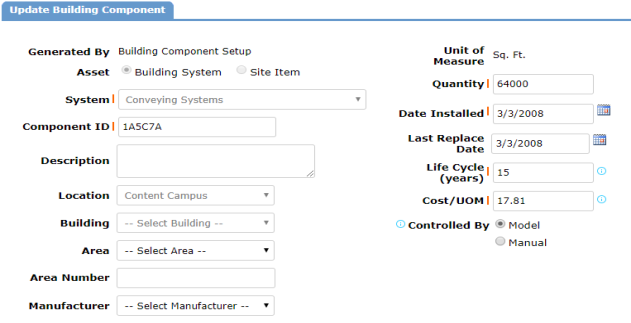
- Click on the Component ID to view the component information.
Splitting Systems
- Enter a Description to indicate which part of the building component this will represent.
- Make necessary edits to the Quantity, Date Installed, Last Replace Date, etc. to reflect the information for this portion of the component.
- If you make a change to the Life Cycle or the Cost/UOM for this portion of the building component, select Manual under Controlled By. This will ensure that the values you entered will not be overwritten by the model defaults when you run the model.
- Click the Save button at the bottom of the screen.
- To create another instance of this system, hover your mouse over the Shortcuts menu and click Duplicate.
- Change the necessary information again for this new portion of the component and click Save.
- You can repeat this process as many times as needed.

Importing Building Components
You can also create new Building Components and update existing ones using the Import feature.
- If you are already on the Building Components screen, hover your mouse over the Related Links menu and click Import.
- You can also access the Import feature from the Information & Analysis section of the home page. Click Import Data, then hover over the Shortcuts menu and click Import.
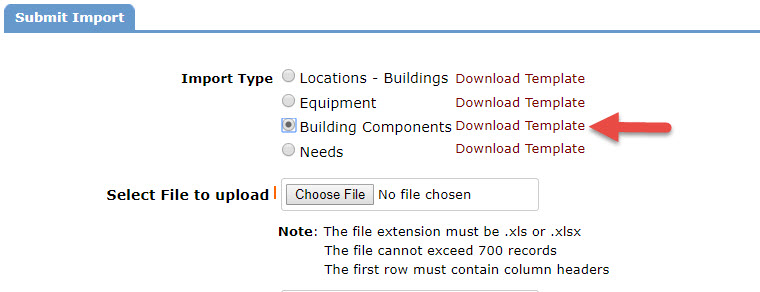
- Click the Download Template link next to Building Components and save the Excel file to your computer.

- Fill out the fields on the spreadsheet for the components that you want to import.
- There is a Code column on the import template spreadsheet.
- If you enter the Code from an existing component to that column, the system will update that component.
- If this column is left blank on the spreadsheet, the system will create a new component with that information.
- Once you have completed entering the information on the spreadsheet, save it and go back to the Import screen.
- Select Building Components as the Import Type.
- Click Browse to search for and select the Excel template you saved.
- If you renamed the tab on the spreadsheet, enter it as the Excel Sheet Name. If you did not rename it, leave it as the default.
- Click Upload.
- On the Submit Import page, make sure the Field name and the Excel Column Names match.
- Click the Validate button at the bottom of the screen.
- When your file has been accepted on the Import Validation screen, click the Import Data button to import your updates.

